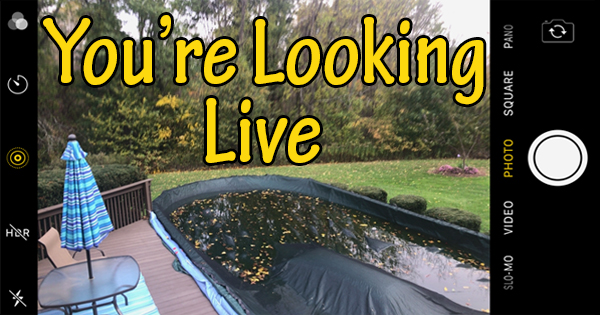
“You’re Looking Live” at a picture of my backyard taken with my new iPhone 7. I like this picture, because it’s a tale of two seasons. In the foreground you see the swimming pool which has been sadly covered for the year, along with deck furniture that I haven’t had a chance to put away yet. In the backyard are some of the fall colors that the Northeast is so well known for. This shot shows the transition that mother nature is currently going through. It’s obviously a still photo…or is it? I took it using a relatively new feature that’s been introduced for the iPhone and iPad: Live Photos. We’ll tell you what they are, and the advantages and disadvantages associated with them.
Live Photos were first introduced with the iPhone 6s and iPad Pro. Since then, every new Apple release has included this functionality. What it is is a still photo that animates motion 1.5 seconds before and after the photo is taken. Essentially, when you click the shutter, you’re at the midpoint of the photo. As you would imagine, the file size of a Live Photo is practically double that of a traditional photo, so be aware of that if you’re running shy of storage space on your device or in iCloud. While you’re only able to take a Live Photo with a “modern” device, friends and family can still view your masterpiece on any device running iOS 9.0 or greater.
By default, Live Photos are enabled on an iPhone 6s, or iPad Pro or newer device. Scroll back up and look at the photo of my backyard. That’s a screenshot that was taken in the “Camera” app. Do you see the yellow “bullseye” on the left side of the screen? That is the Live Photos icon. Because it’s yellow, it means that Live Photos are enabled. If you were to go to your “Camera” app and check whether your device is Live Photo ready, tap the icon to turn the feature on or off. You can also tap “Settings” then “Camera” then “Preserve Settings”. You may then toggle “Live Photo” on or off permanently.
So, what’s the appeal to Live Photos? Well, there are animation effects that can be added to give your photos more interest. Any photo that is a Live Photo displays a “Live Photo” tag in the top left of the picture in your “Photos” app. Simply tap on one such photo, and swipe up on the photo. You’ll be presented with options such as “Live”, “Loop”, “Bounce”, and “Long Exposure”. Tap on any selection to see what happens with your Live Photo. I have to say that the bounce effect is pretty cool when watching my daughter move around! Simply hold your finger down on any Live Photo to watch the animation. These effects can be changed any number of times with no impact on the quality of the picture. If you were wondering, yes, Live Photos can be used as your device’s wallpaper. Tap the “Share” button in the bottom left corner of the screen. Scroll to the right and tap “Use as Wallpaper”. Tap “Set” and you’re done. Incidentally, if you’d like to change a Live Photo to a traditional photo, again tap the “Share” button. Next, scroll to the right and tap “Duplicate”, then tap “Duplicate as Still Photo”. Your Live Photo will remain in tact alongside your new, still photo. Traditional “still” photos cannot be turned into Live Photos.
In addition to file size, there are a couple of big drawbacks to Live Photos in my opinion. If you’d like to download your photos to a computer (read “The Pics are In” for details), Live Photos won’t transfer. The only way to send a Live Photo to a Windows P.C. is via e-mail. Duplicating a Live Photo as a still photo would be a way to get around that. Also, Live Photos cannot be edited in programs such as Adobe Photoshop. While Live Photos are JPG files, they aren’t traditional JPG and cannot be opened. Otherwise, snap away – just make sure to hold the camera still!
